
Korg Wavestation EX
Personal History
The Wavestation is probably the instrument, which remained in my collection for the longest time, actually it must be since around 25 years.
In 1990, when the Wavestation was brought to the market, it was considered as an extremely versatile and creative piece of gear. The sounds it was capable to produce were astounding: the basic waveforms could be changing again and again, while a note was being played, either slowly for evolving pads or quickly for rhythmical patterns. Additionally the programs were rich and complex, with several of such changing sounds layered. The results were crazy cutting lead sounds, thick lively pads and lots of mystical atmospheres.
When I had saved enough money to buy it, it was already the EX variation, which came out 1991. I will explain more on the differences later on.
So there I had this fantastic keyboard at home and was completely enthusiastic to start sound programming right away. However I quickly realized that this would be not as easy to achieve as I had hoped. The structure of the Wavestation is pretty complex and it takes time to study it´s possibilities. This is both on the parameter number, as there are lots of them which need to be understood, and on the option side, means what possibilities unfold from the technical capabilities.
So let´s take a look at the basic structure of this synthesizer.
Sound Structure
Basically I would say the strength of the Wavestation lies not in it´s subtractive synthesis options (which are still there). For example the filter does not offer resonance nor does it sounds very characteristic, so it is a rather basic tool for shaping sounds, not as influential on the sound as in classic analog synthesizers (by far not). It is rather the complex and unique ways the Wavestation can handle playback of samples and waveforms, which make it stand out until today. There has never been such a system since.
Let´s start at the bottom: a single sound (called “Wave”, this is not even yet a sound program) consists of an oscillator, filter, amplifier and some modulation options such as 2 LFOs and 3 envelopes.
Next level is a „Patch“. A Patch can be set to consist of 1, 2 or 4 of above mentioned sounds (“Waves”), so here up to 4 Waves can be layered, plus some basic settings and FX routing. Although the Patch is the core sound, this is still not the playable program, which instead is the “Performance”.
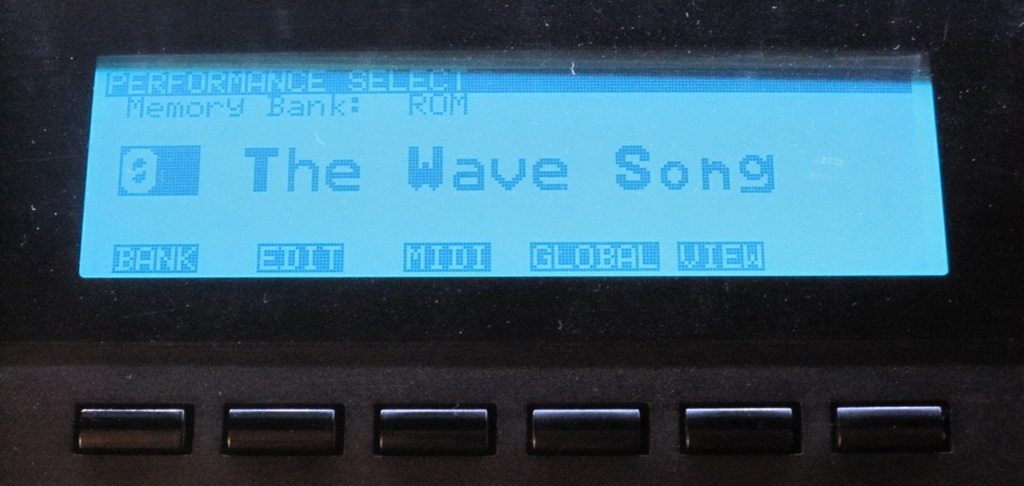
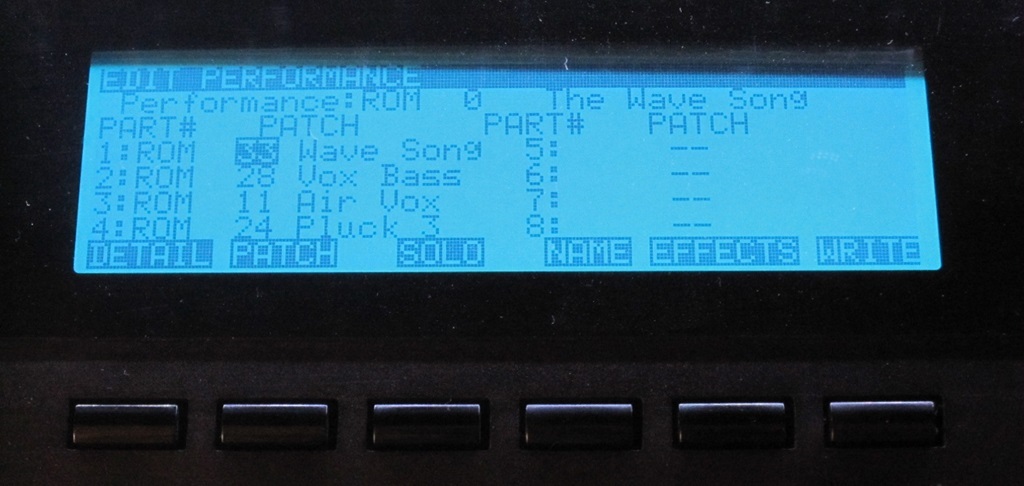
So when you switch on the Wavestation, it will start on Performance level as a default. A Performance can consist of up to 8 of above mentioned Patches with detailed settings for each Patch plus the actual FX. That means here you can already make quite complex split and layer configurations, for which in other synthesizers you would need to engage a combi or multi mode.
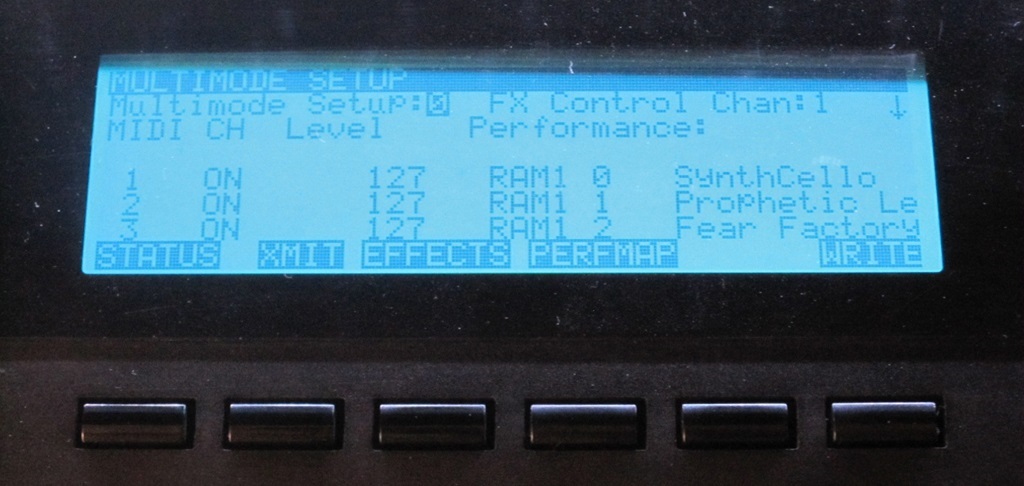
The multi mode is also available in the Wavestation, where it offers to involve up to 16 different Performances, one on each MIDI channel.
So go back:
A Wave consists of oscillator, filter, amp plus modulation.
Up to 4 Waves make a Patch.
Up to 8 Patches make a Performance.
Up to 16 Performances can be used in multi mode.
See how complex it can get? And we are just scratching the surface...
Wave Sequencing
One of the two outstanding features of the Wavestation is Wave Sequencing. If you go to the oscillator section of a Wave, you can choose one of the 484 waveforms squeezed into the wave ROM (talking about the EX, I think it was 365 in the original Wavestation).These are (multi)samples ranging from pianos, guitars, strings, synths, basses, percussion, noises, all the kind of stuff that you would expect in an early 90´s keyboard. Due to the limited memory of just 4 MB the samples are quite short, but on a fairly good quality level for a synth of this era. Furthermore the memory is filled with tons of single cycle waves. Many of them are named „VS...“, so obviously they were derived from the SCI Prophet VS (Dave Smith and John Bowen from Sequential Circuits were among the developers of the Wavestation). Then there are many waves derived from classic analog synthesizers.
This demo plays only about half of the waves up to the VS waveforms:
But instead of just selecting such a single sample or waveform, you can also select a „Wave Sequence“. And here the fun begins: a wave sequence is actually a sequencer inside the oscillator. So how does that work?
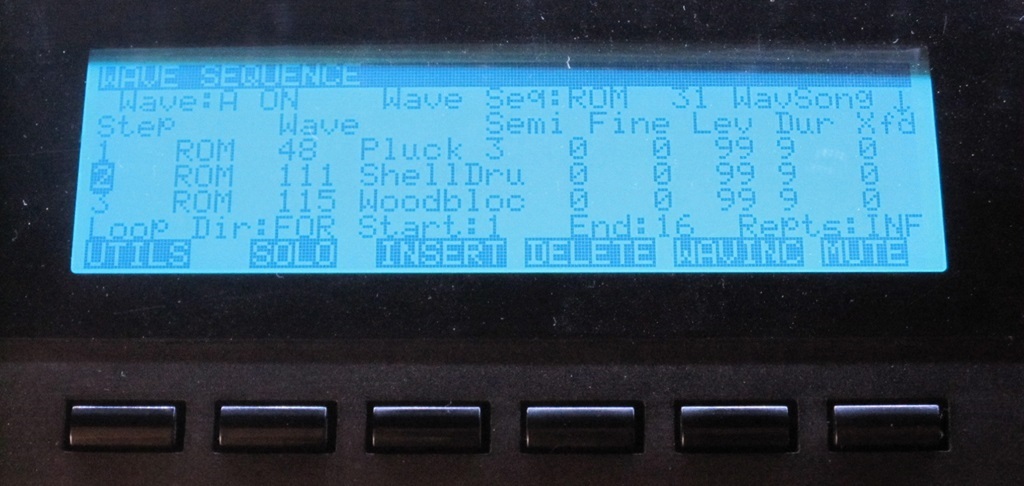
Entering the wave sequence page, you see a list of entries, which are in fact the steps of the sequence. For each step you can specify the wave, note shift, fine tuning, level, duration and crossfade. Later on, when you play a note, this list is played back from top to bottom (well, normally, but with some exceptions).
Specifying the wave is easy to understand: you select one of the above mentioned samples or waveforms to be played during this step.
Note shift means the interval based on the note you played. That means you specify a relative difference rather than a specific note. This is necessary because the Wavestation will transpose the sequence automatically based on which note you play. So you program a melody by setting the interval of each note based on the note you play. And this works even polyphonically!
Fine tuning works the same, but it is rather useful for creating slight differences in pitch from one step to the next.
Level simply means the volume of each step, so you can create more dynamical sequences.
Duration is the length of each step. Using the same duration for all steps would result in a typical step sequencer or arpeggiator feeling, while using different durations you can create complex rhythmical patterns. Again this is a relative parameter, because the overall speed can be controlled either by the internal clock or externally via MIDI to make the sequence follow your song tempo.
Crossfade really is the salt in the soup: instead of switching from step to step you can create a crossfade between the steps. „0“ means a hard switch from step to step (wave to wave), while higher values result in a smooth transition. Of course the crossfade time is limited by the length of the involved steps. So to create very rhythmical patterns, you would set the crossfade to 0 or at least very low values and the durations to short, while for slowly evolving pads you would set long lengths with long crossfades.
Rhythmical example:
Example with long crossfade durations:
A wave sequence can be looped, so next you can set the loop direction (restarting from the beginning or playing back and forth), the loop start and end step and the number of repetitions (can be set to endless as well).
In this demo it plays a resonant saw with different filter cutoff settings (available in the wave ROM as individual waveforms) in varying step lengths, plus some random other waves here and there:
After all the Wave Sequencer allows to create ever changing sounds (when note shift for all steps is set to “0”) or even melodies (when set to different intervals). And all this is just the oscillator!
The Macros
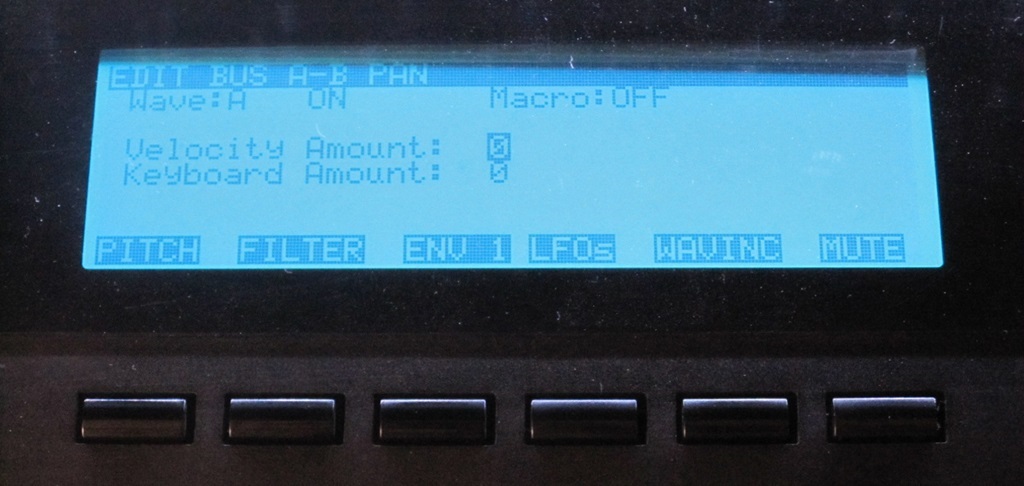
The next sections are called “Macros” and consist of pitch, filter, amp and pan.
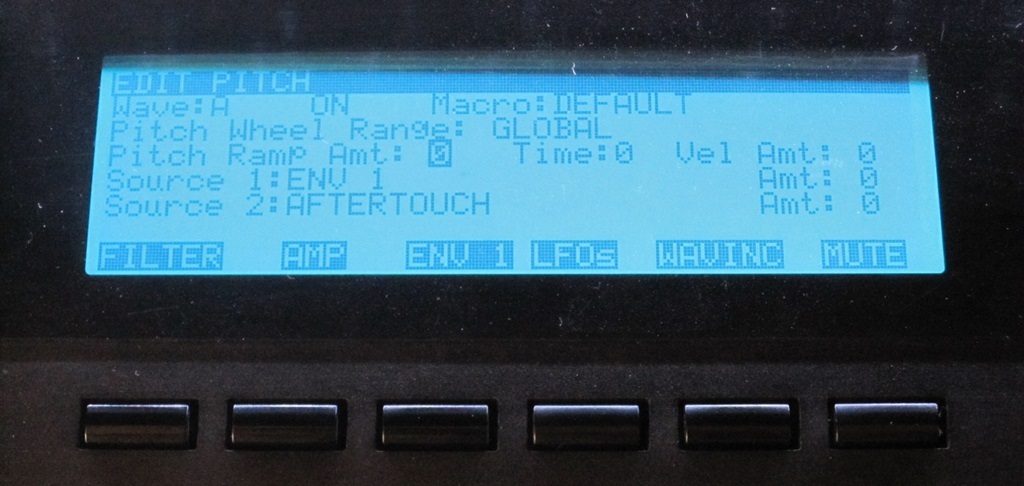
The pitch section sets the overall coarse and fine tuning including a very simple pitch envelope called Pitch Ramp and 2 modulation options. Here any kind of modulation source can be selected: key scaling, LFOs, the free assignable envelope (ENV1) and all kinds of realtime controllers. This concept appears in all areas of the sound, so it is not as freely editable as a modulation matrix, but still allows for a great degree of dynamic control.
Next is the filter, which as I mentioned above is not as important for shaping the sound as in other synthesizers, because it is a completely digital 90s one, means not sounding very characteristic and it lacks the resonance parameter. So while it is basically making the sound more or less dull, it can be helpful if used to the right degree. Again 2 free modulation sources can be selected as in the pitch section.
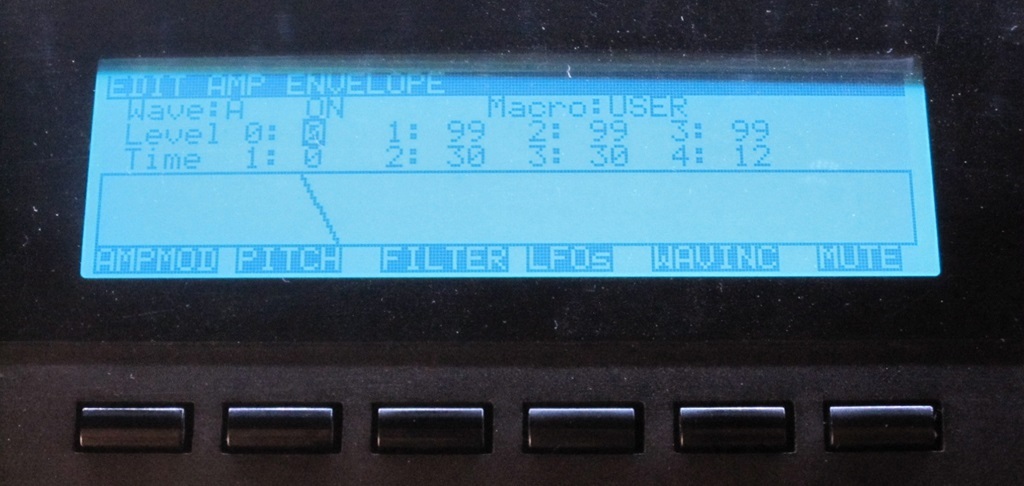
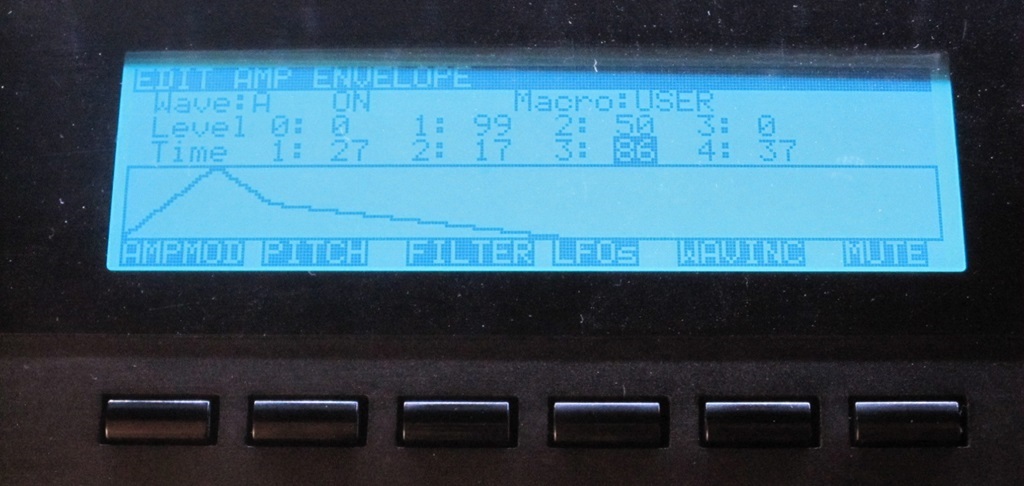
As you would expect it in any synthesizer, behind the filter follows the amplifier. It has it´s own dedicated envelope plus the usual velocity sensitivity, the 2 free modulation sources plus some dedicated tricks like attack time modulation and overall speed modulation by key scaling.
The simplest section is the pan section, which just sets pan modulation by velocity and by key scaling.

Now keep in mind that after all these many settings you just created a part (Wave) of a Patch! It can be up to 4 of such parts, which brings us to the next feature of the Wavestation, a concept that was taken over from the legendary SCI Prophet VS and others:
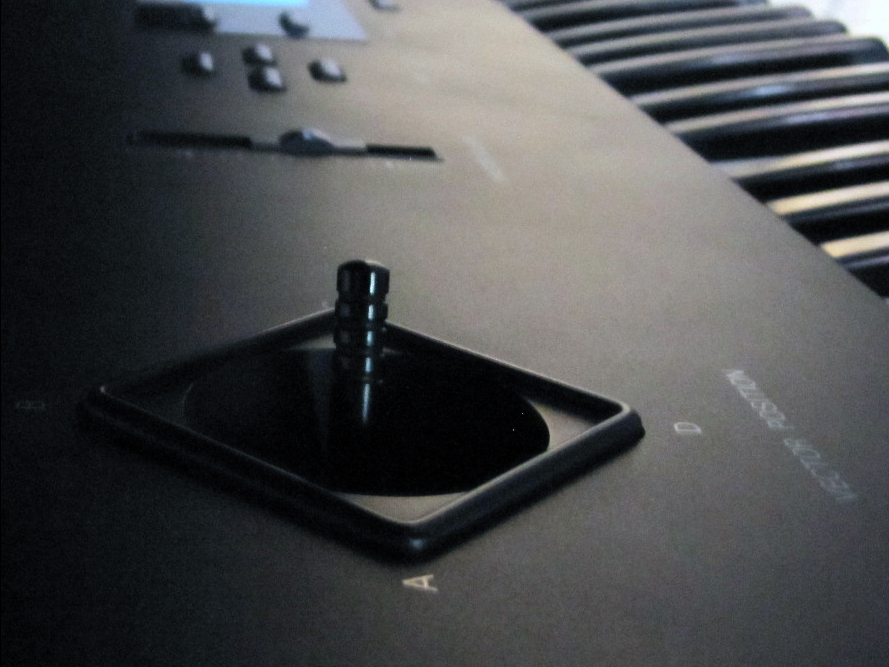
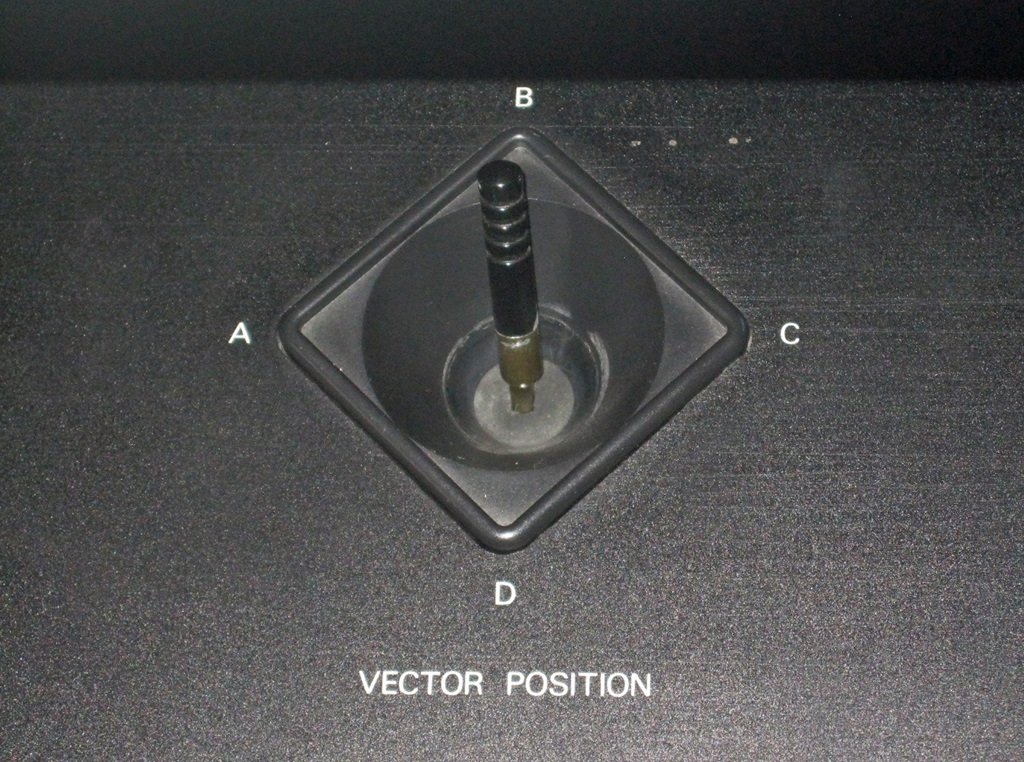
Vector Synthesis
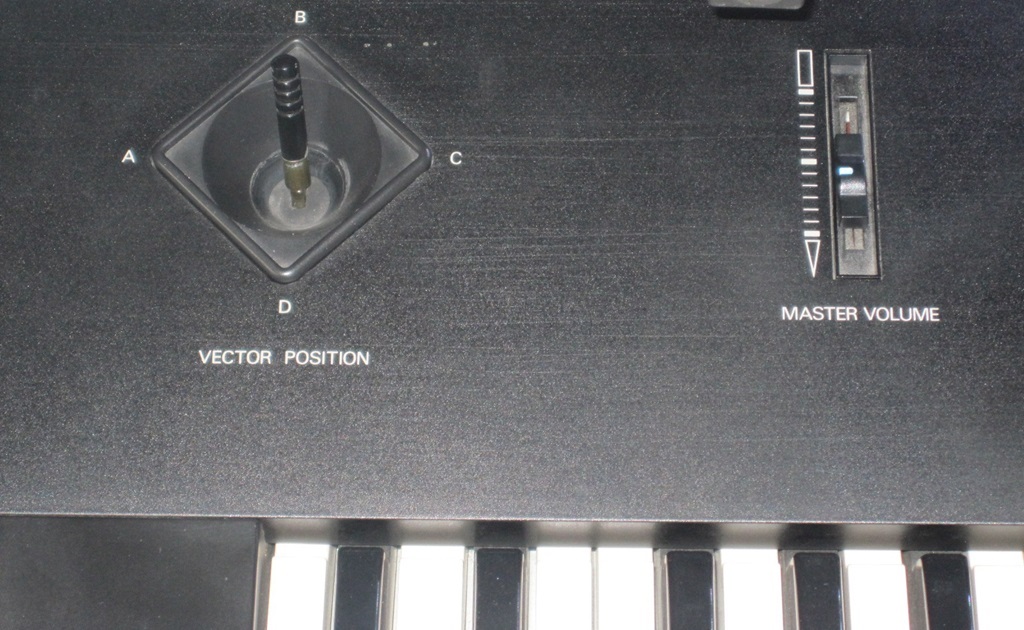
Each patch can involve 1, 2 or 4 parts, each of them includes an oscillator (including wave sequence), filter and amp as I just described above. Now as soon as you select „2“ or „4“ it means you can layer those parts. But there is more: by using the vector stick (which actually is a non-spring-loaded joystick) while playing a note you can change the volume balance between the parts in realtime. If it is 2 parts you can blend between them by moving the stick left (part 1) or right (part 2) or anywhere in between. When 4 parts are involved you can use the left, right, up and down position of the stick.
So while you already might have 4 sounds with complex changes due to the wave sequences, you can add further movements in the sound by crossfading between these 4 sources while playing.
Further Options
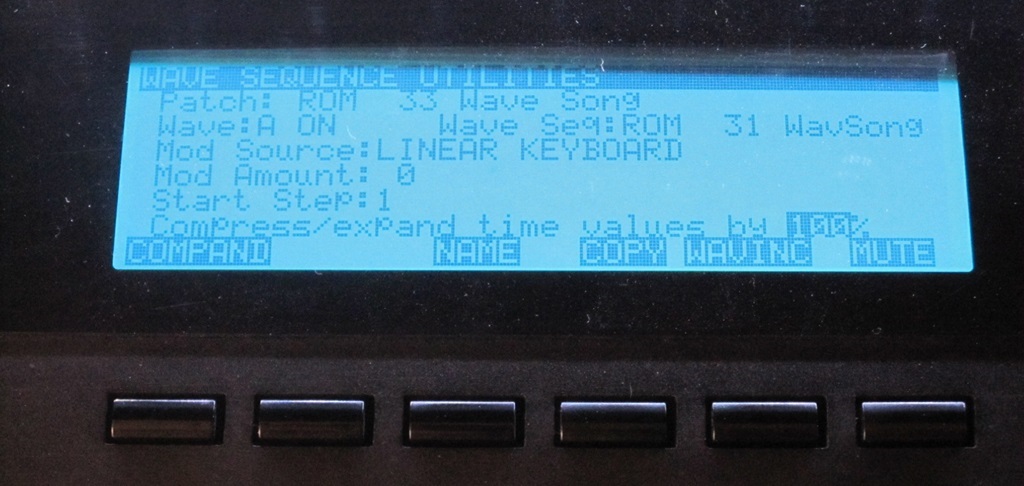
1. Wave Sequence Modulation
The wave sequences playback can be modulated in various ways. Non-continuous controllers such as key scaling or velocity can alter the start step of the sequence. For example the higher notes you play, the later step the sequence starts from (or vice versa). The same can be achieved using velocity.
However when you use continuous controllers such as mod wheel, aftertouch, mod pedal or the like, you can play the sequence manually. That means the sequence will not be played automatically any longer, but you can “scroll” through the sequence forwards and backwards e.g. by moving the mod wheel up and down. Now when you play a note, just step 1 will be played, until you start moving the wheel to switch (or crossfade) to step 2, 3 etc. It sometimes reminds me a bit of the typical Waldorf wavetables.
2. Oscillator Hard Sync
The Wavestation is capable of hard syncing 2 oscillators, pretty much as in a classic synthesizer. As soon as you select a 2 or 4 oscillator configuration for your patch, the hard sync option will appear. When choosing 4 oscillators, oscillator 1 and 2 and oscillator 3 and 4 will be synced, which results in 2 independent sync sounds. Keep in mind that by using the vector stick later on you can alter the balance between the oscillators while playing, in this case between sync master and slave. When using 4 oscillators this is true for left/right movements of the stick as well as up/down.
Example with 2 oscillators:
and with 4 oscillators (2 hardsync pairs):
Admittedly the hardsync works best with classic waveforms. Using too complex waveforms or samples will quickly lead to unpleasant distortions.
3. Mix Envelope
While the vector stick can be used creatively to mix the parts while playing, you can instead use the mix envelope to automate the crossfading. You can select 5 points in time (from 0 to 4, while 4 is the release part) and for each point specify the vector position simply by moving the vector stick there. Then you can define the time, which it takes to travel from that position to the next one.
Back and forth loops are possible as well.
Unfortunately the vector stock is not motorized, so it will not move along with this envelope ;-)
4. Effects
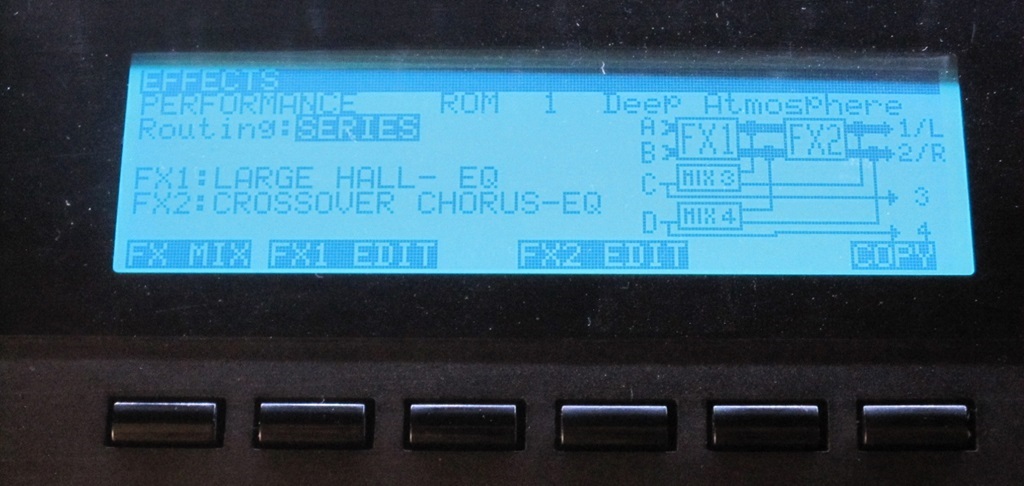
The Wavestation comes with 2 stereo effect processors, each of them can produce a wide range of effects such as different types of reverb, delay and chorus, some more exotic ones such as flanger, exciter, distortion, phaser, rotary speaker, pan modulation, pitch shift and even a few vocoders. Most of them have an EQ attached and finally there are combination effects such as delay->chorus, delay/distortion etc. This gives you 2 effects (plus EQ) from one FX unit.
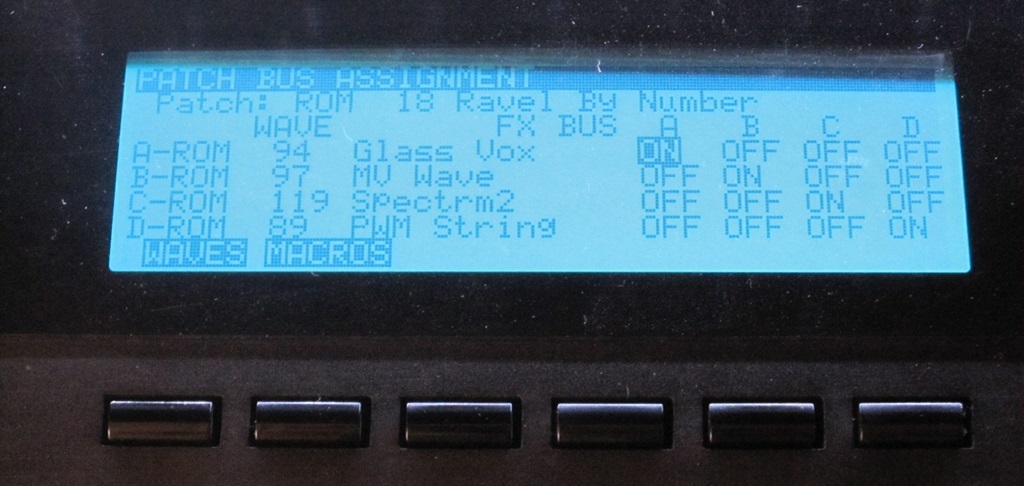
The routing here works as follows: each of the up to 4 Waves inside a Patch can be assigned to one or more of the FX buses A, B, C, D. The 2 FX units can be arranged on Performance level either in series, then buses A and B run through both FX, while C and D carry the dry signal, to be mixed with the FX Output signal afterwards.
When the FX are arranged in parallel, A and B go to FX 1, while C and D lead to FX 2.
It is a very flexible system, with limits, but enough options to cover lots of different settings.
Finally the routing also determines how much of each FX bus and FX signal goes to which of the 4 outputs, which are arranged in two stereo pairs.
In multimode, where you can set one Performance for each of the 16 MIDI channels, of course all of them have to share the 2 FX units. This is done by selecting one of the channels and all Performances will then use the FX settings of the Performance on that channel. Naturally this limits the usability of the effects, because when going to multimode, you will loose the individual settings for most of them and need to find a suitable common setting instead.
While the quality of the FX might not be able to compete with todays standards (especially the reverbs), they still add some character to the Wavestation´s sounds.
And there is another plus: each FX type can be edited more or less detailed, including live modulation! For each effect at least one parameter can be modulated by any of the available controllers. The destination can not be set freely, but is predefinded for each effect type, but the selection is pretty clever and allows for additional expressivity via the FX. For example the reverbs allow dry/wet relation to be controlled.
For the distortion this can be the hot spot and the level. With this you can create a sound similar to a dirty, resonant (!) filter with controlable “cutoff frequency”.

Opportunities
Now what can you achieve with all these option?
Well, it starts from using a Performance with only one Patch being a single part sound using a simple sample or waveform with some filtering and envelopes. The wave ROM includes quite some cheesy 80s synth sounds as samples, so you could build such sounds very quickly. But this is too basic for a Wavestation and you wouldn´t do that!
Then you could use a 2-step wave sequence, blending from an attack sample into a static looped waveform to resemble Roland D-50 style sounds. Still you wouldn´t want to do that.
However a 2-step sequence can be used to create a „doubled“ sound with one voice, by setting the same wave (e.g. sawtooth) to both steps and just set them to slightly different fine tuning. Then crossfade between them slowly by setting a long crossfade time. This creates a sound similar to having 2 classic oscillators detuned against each other. Of course you can also use two different waves to achieve this effect together with a spectral change.
By adding more steps with different waves the whole thing can become as complex as you wish.
Now take up to 4 of such sounds and set all the wave sequences to slightly different lengths, with endless repetition. Even without using the vector stick you end up with an evolving pad, that „never“ repeats.
Now if you create melodies by setting different note shift to each step, you can perform a whole piece of music by playing just one note!
Another option is of course the rhythmical approach. Instead of using long durations and crossfades, you can set them to short and thus create percussive patterns or arpeggios. Here the percussive samples (especially the various drum sounds of the EX version) come in handy to create complex rhythms.
Anything in between the above mentioned or any combination is possible. Actually it is so many options that you might find yourself a bit lost. It really needs some experience to understand the possibilities and then start programming sounds with a certain target in mind.
One more example: in a wave sequence you can create breaks by setting a step to level „0“. So you could create a melody in your head, then allocate the notes of the melody to 4 different wave sequences, so that only one of the sequences plays a note at a time. This way you can use the vector stick to change the dynamics for each note, even while this note is being played.
A similar approach is using this technique with drum patterns. You could allocate the single drum parts of a rhythm to 4 sequences (4 oscillators), e.g. 1=bass drum, 2= snare drum etc. Then later you can alter the balance between the parts in realtime with the vector stick. Using more complex drum parts in each sequence this can become like mixing 4 different sampled drum loops, but being able to alter pitch by playing differnet notes on the keyboard (but with the same tempo).
A very experimental and pretty difficult way to use wave sequences came to my mind: speech synthesis. You can use many of the waveforms to resemble vowels. Additionally there is a range of „vocal percussion“ samples available, at least in the EX version. So I created a wave sequence with vowels by carefully selecting the right waves (including breaks where the consonants should sound) and another one for the consonants, using the samples. Now the part with vowels would be transposed normally, while for the consonants I set the part to not transpose at all.
The most difficult part here is to select the right waveforms for the transposing bits. Certainly it will never sound realistic and probably it would need more investigation, but it shows again the unbelievable options you have with a Wavestation.
By the way I used this technique to create the “KlangCollage” audio logo, which appears at the start and end of my videos.
Here are a few more sound demos, first a couple of preset sounds:
and a few custom made sounds:
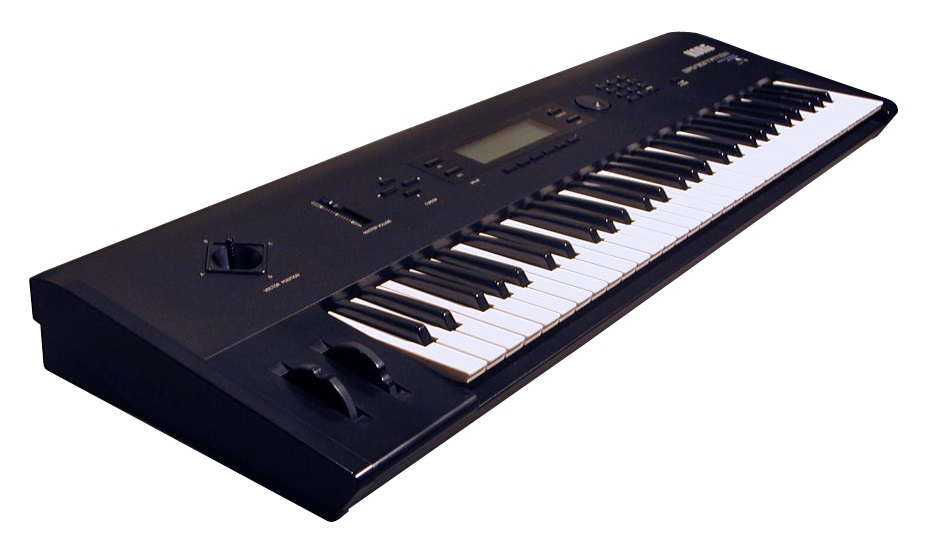
The Outside
The Wavestation is a robust thing: the panel and bottom are made of metal, with plastic side parts.
The keyboard has a very nice action, allowing to play with velocity and aftertouch, it is just a bit noisy.
On the left of the keyboard you find the pitch and modulation wheel, as you would expect.
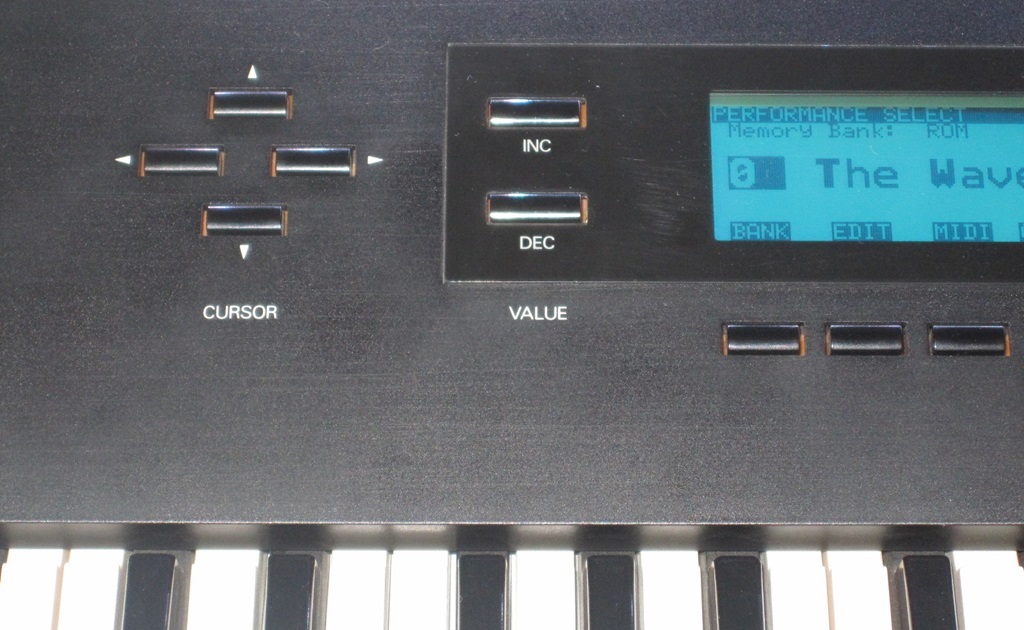
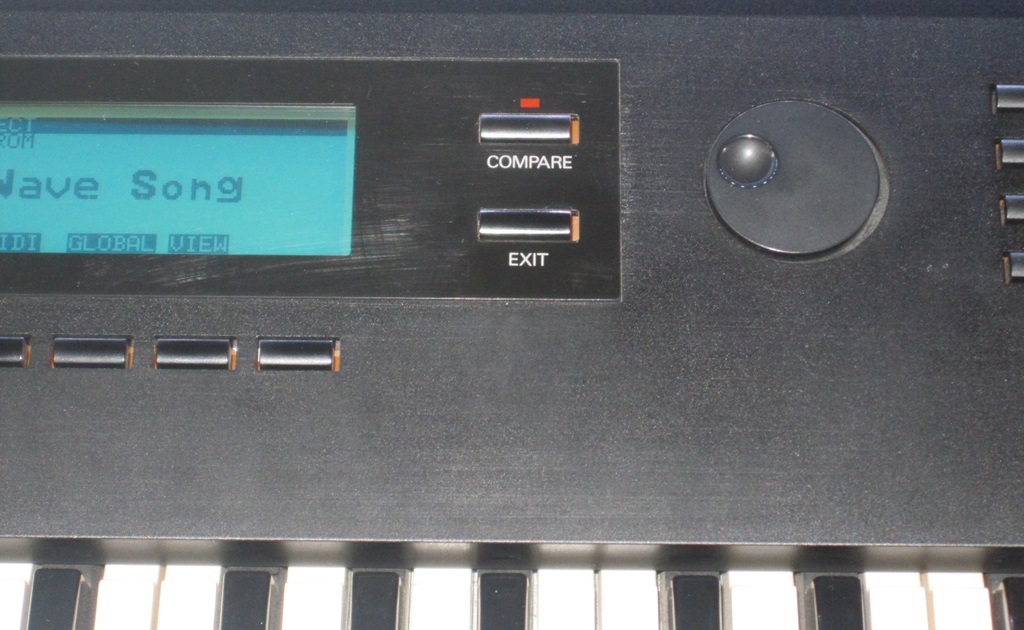
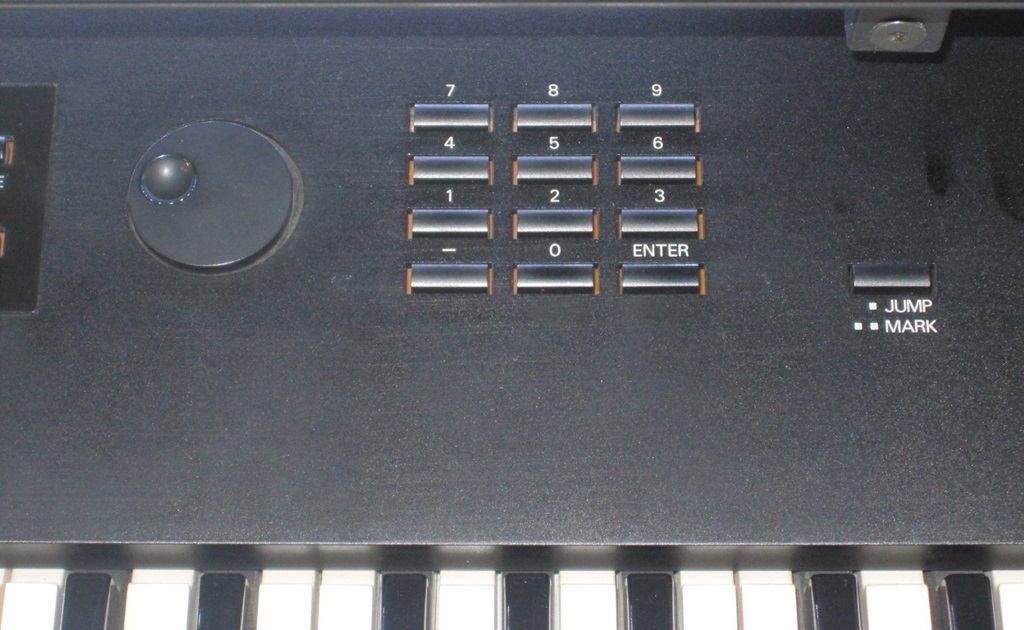
The above panel starts from left with the most unusual control element, the vector stick. To the right follow a volume slider and 4 navigation buttons (up, down, left, right). Next is the display unit with the LCD in the middle, increase/decrease buttons on the left and compare and exit buttons on the right. Below the display are 6 soft buttons, which function is displayed on each display page. Then next to the right is a large data wheel, a ten-key pad and a jump/mark button. The latter allows you to mark different pages and then quickly jump between them with just one button press.
In all I always found the user interface so logical that even after some years of hardly using the synth, I could restart programming as if I never stopped. I also tried using editor software such as the good old (yes, very old) Emagic Sounddiver, but for me the UI of the original still works best.
On the rear you find the phones out (which should have been accessible from the front), the 2 stereo outs, connectors for assignable pedals, foot switch, MIDI in/out/through, power cord and 2 slots for programm and pcm data cards.
The only issues I had during the past 25 years is the need to exchange the emmory buffer battery (Standard CR2032) every 5-10 years. And I had the display changed a couple of years ago. Firstly the display backlight will fade and in the end you look at an unlighted LCD. Secondly over time the electronics will produce a whining sound, not very loud, but clearly annoying.
Model History
Shortly after they released the original Wavestation in 1990, Korg realised that despite (or because of) the exceptional sounds, customers rather bought keyboards that could produce more standard ones, especially recreations of acoustic instruments. Therefore they released the Wavestation EX, which had a larger wave ROM (4 MB instead of 2) and they filled the additional space with more commonly used sounds: a multi-sampled piano was for sure number one on the wish-list. Other instruments followed such as winds and drums. This enabled users to not only address the special Wavestation type of synth sounds, but also to play very normal “workstation” standard sounds. This was meant to convince more keyboarders to go for the Wavestation as part of their rig.
As it was common at that time, they also released a 19” rack version, the Wavestation A/D. Again they managed to squeeze in an additional and unique feature: an audio input (thus “A/D”)! The signal put inside could simply be routed through the internal effects (including the vocoder), but it could also be used as part of a wave sequence. This definitely allowed for some nice new tricks.
Finally they realised that some customers wanted to use the typical Wavestation sound, but not bother with programming their own stuff. For them they made the Wavestation SR in 1993, again a 19” rackmount module, but only 1 HU, a simplified UI, but 8 ROM banks (instead of 1) full of preset sounds. Now users could simply enjoy tons of sounds in one slim module, even though with limited programmability because of the small display and a bunch of tiny buttons.
Nowadays the Wavestation is actually still alive: the Korg Legacy Collection brought back this great synth as a VSTi in 2004 and finally in 2016 they released the iPad version of the Wavestation. Both of them surely have their advantages, maybe most of all making this unique technology available for fairly small money (provided that you already own a computer or iPad). Still personally I prefer to use the hardware keyboard.