
Kawai K1r
Some History
After producing analogue synthesizers, first under the name Teisco, later under the Kawai brand, in 1986 Kawai presented their first synthesizer incorporating digital technology, the K3. It used digital oscillators, that could play one from a range of simple digitally stored waveforms. One special feature was the option to build up an alternative waveform using additive synthesis, made up of 32 partials and programmed by the user. However the K3 still provided an analogue filter and amp, so it was what we nowadays would call a hybrid synthesizer.
One year later, in 1987 they released the K5, which was all digital. Now they had jumped completely on the additive train, in that the K5 employed so-called harmonic generators as oscillators. They allowed the user to set up the level for each of the first 64 partials of a spectrum or, in double mode, for even 128. Also the filter, while providing a mostly common parameter set, is said to work via controlling harmonics in the background. Being a very sophisticated machine for that time, it probably wasn´t a commercial success. Bulding up a sound from harmonics, i.e. single sine waves, was a quite unpredictable and definetely time consuming work, although they included a variety of functions to speed up the process a bit. Plus it sounded – well, let´s say special.
In 1988 Kawai presented the K1, a budget synth, which was built from the experience they had gained from previous models. It comes with waveforms, which were made using the additive technology from the K5 and therefore share some of the typical K5 sound character. But instead of forcing the user to spend hours with building up harmonic spectra, they just implemented around 200 simple waveforms to choose from. As it was the time, when sample-based (and thus „natural-sounding“) keyboards such as the Korg M1 gained a lot of attention and success, Kawai decided to spice up the rather sterile sounding static waveforms with a small selection of samples. Also they developed a structure, in which either 2 or 4 sounds, so-called „sources“ could be combined to make up a sound.
The K1 was one of my dream synths in my young days, as its price tag was quite reasonable, but still I coudn´t afford it. Some years later I played in a band, where we used the PH50 „pop keyboard“, a preset only version of the K1 with cheap feeling keys in a cheap looking plastic cabinet.
So when I came along a used K1r, the rack version of the K1, a couple of years ago, in good condition for a good price, I felt a sense of nostalgia and bought it.
Going through the presets brought back good memories, but of course I wanted to find out, how exactly this tone generation works and what else I personally could get from it. So I made my way through the parameter set, which isn´t too complex, as it mostly consists of selecting a waveform and setting an amp envelope for it. Repeat this for up to 4 sources and you´re basically done. By the way I quickly changed to my old copy of Sound Diver for sound programming, as the UI of the synth itself is quite a pain to use, by todays standards ( more on that below).
User Interface
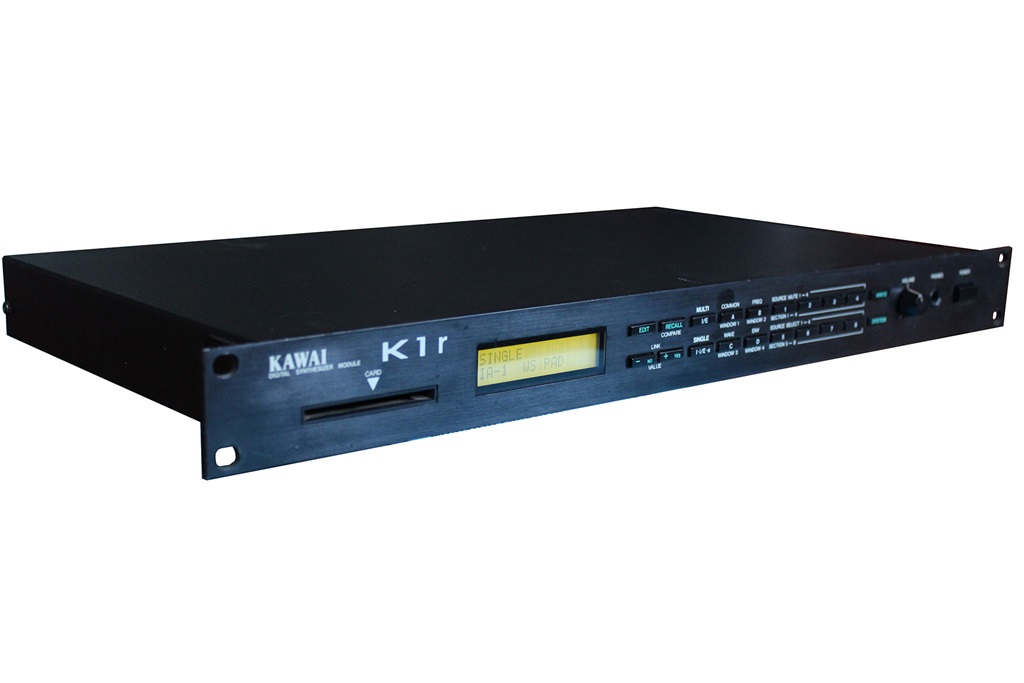
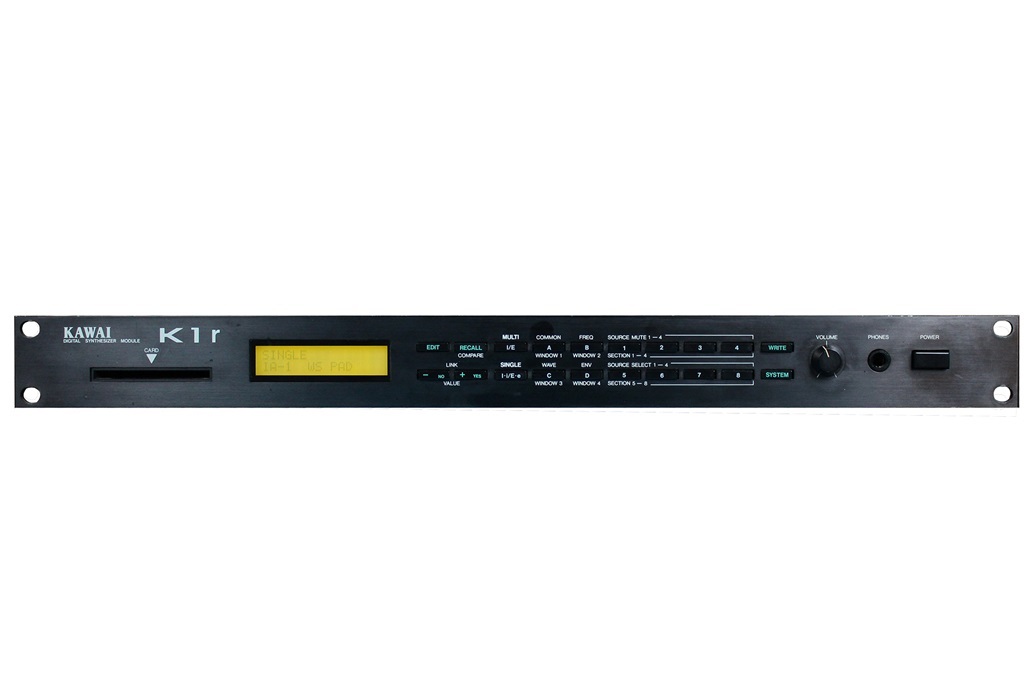
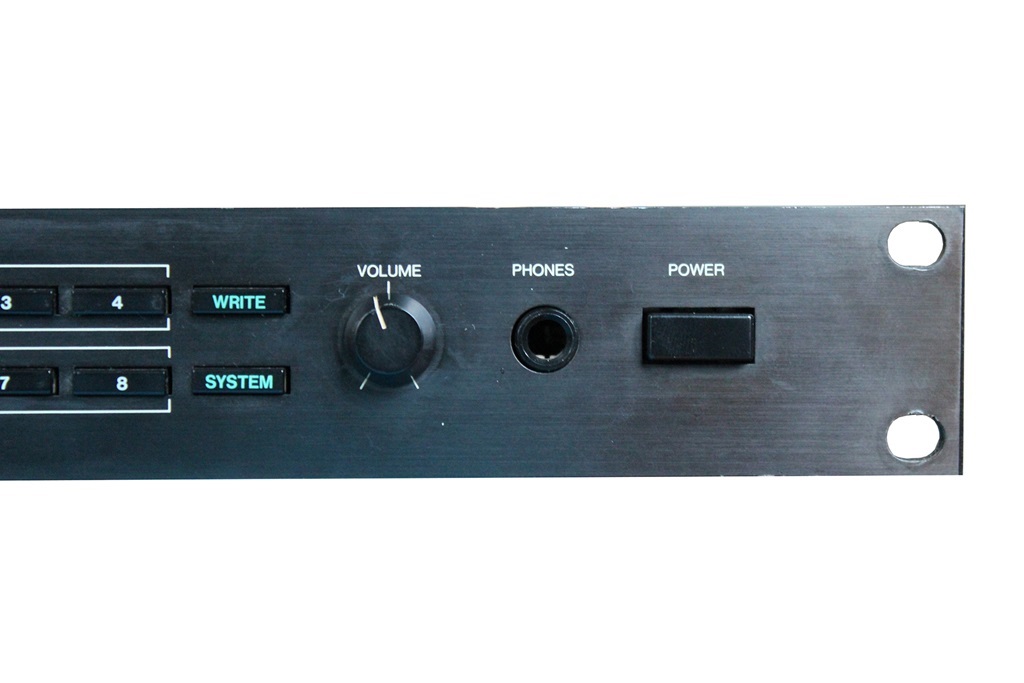
The 1HU rack module comes in the typical 80s black casing, with a brushed metal front that looks nice and makes the unit feel pretty solid.
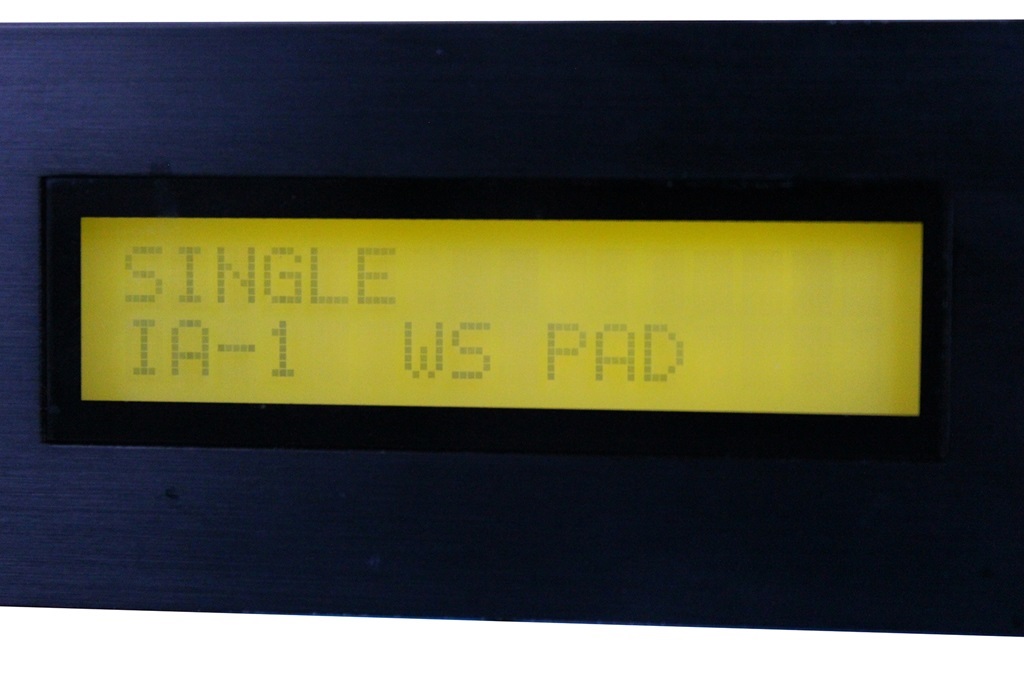
The UI starts on the left with a card slot for dedicated RAM cards to expand the memory. Next is the display, a (again typical 80s) lighted LCD with two rows of 16 characters. While the upper row shows the mode you´re in or the function area, the lower one displays either the currently selected single or multi program number and name or the parameter and its current value in edit mode.
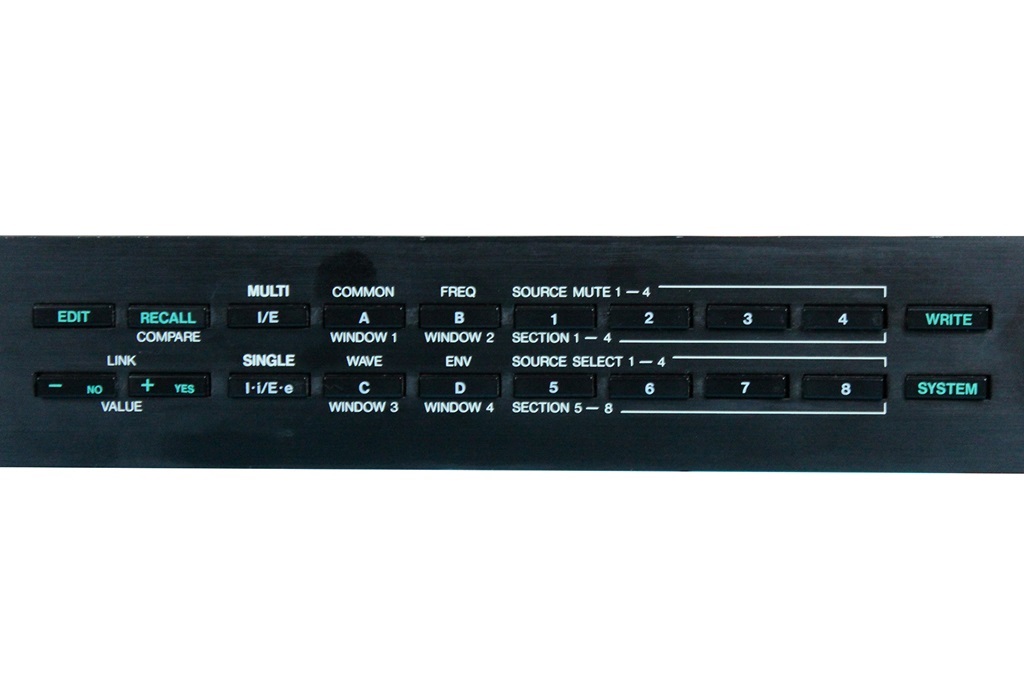
Then follow two rows of 9 buttons each, which are to be used for the whole operation of the unit, from selecting modes and programs to accessing all the editing options. Most buttons have alternative functions and especially in editing mode, they have to be pressed repeatedly to step through a certain paramter set. For example there is a button called D/Env/Window4, which in play mode selects the memory area „D“, while in single edit mode it gives access to the envelopes. After selecting the source to be edited by one of the other buttons, you can step through Level, Delay, Attack, Decay, Sustain, Release, Velocity Curve, Level Mod Velocity, Level Mod Pressure, Level Mod Key Scale, Time Mod Velocity and Time Mod Key Scale. So in case you just adjusted the decay phase of the envelope and now you would like to go back to the attack phase, you have to press the button „D“ 10 times to bring the attack value to the display. This makes the operation quite slow and even worse, if you press too quickly and miss the wanted function, you have to cyle through the whole set again. And finally when you reached the right parameter and you want to alter its value, there is only a set of two buttons for „+/yes“ and „-/no“. So in all really a lot of button presses have to be performed during the whole operation.
Next to the buttons is the volume knob, the only „movable“ control on the whole panel, then follow the headphone plug and finally the power button.
As mentioned above, operating the unit (especailly programming sounds) is not hard to learn, but pretty inconvenient.
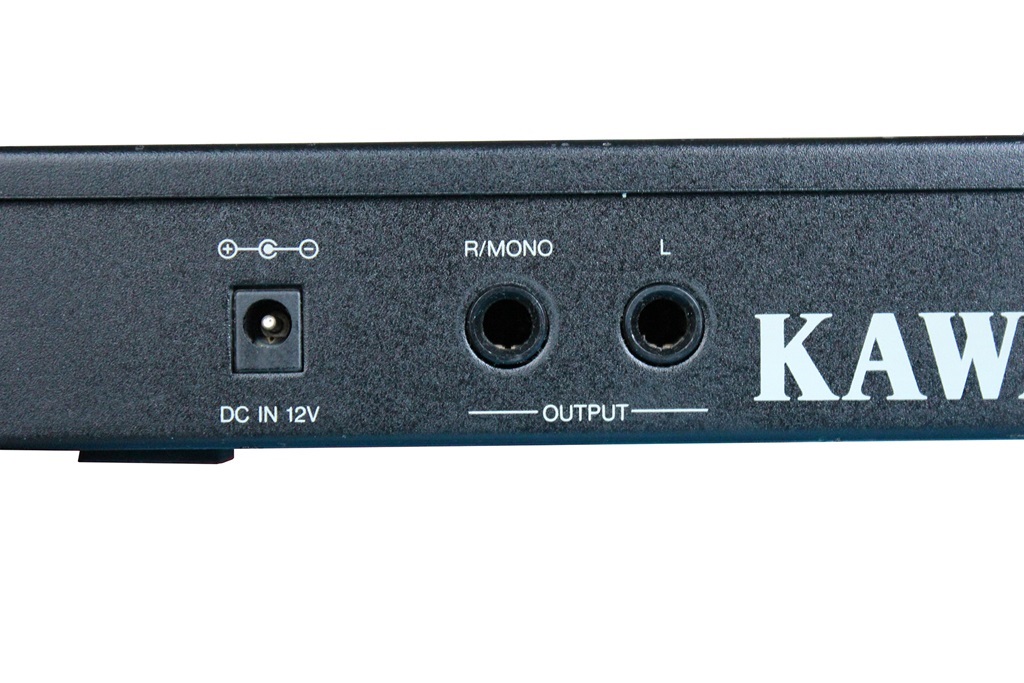
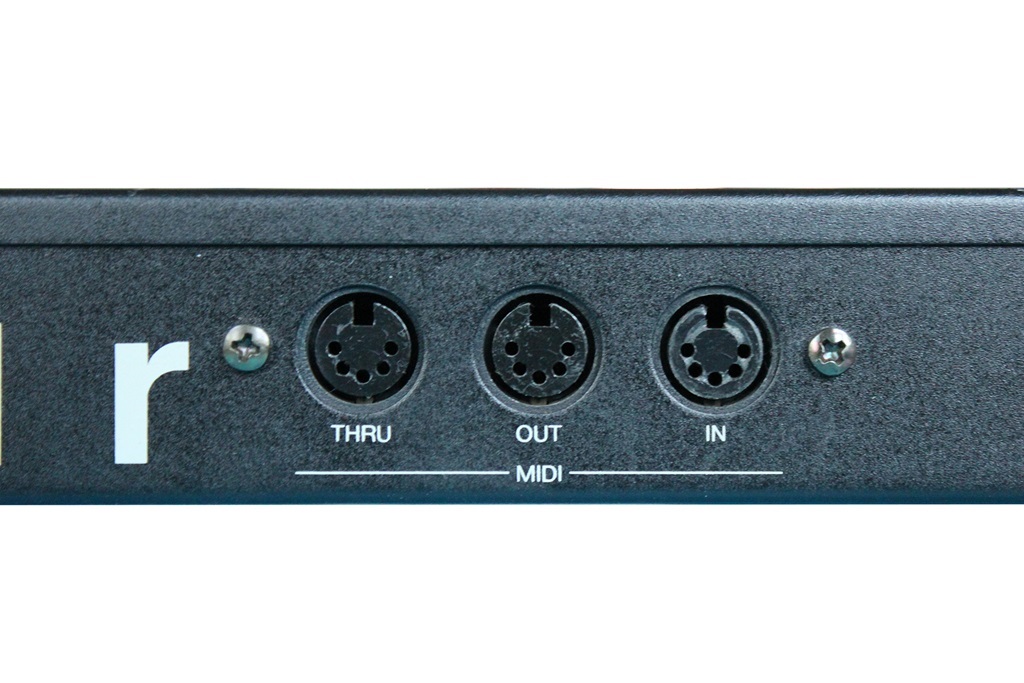
The rear could hardly be more simple: here is PSU inlet, the stereo out (R/Mono, L) and the usual 3 MIDI sockets In, Out and Through.
Tone Generator
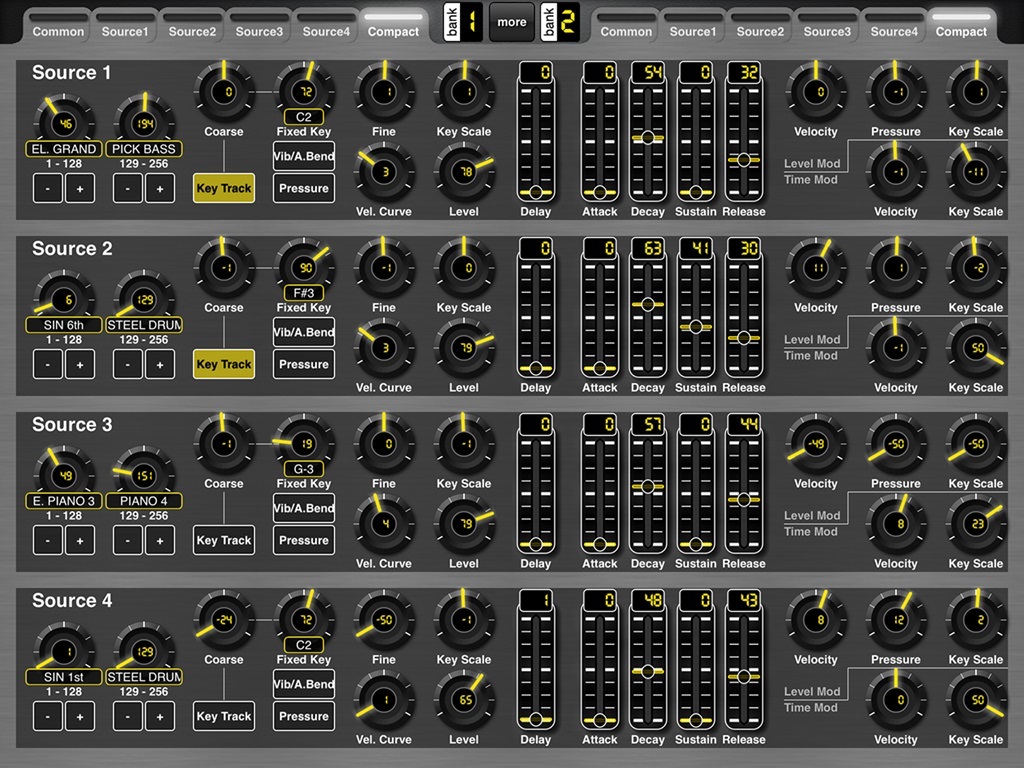
As mentioned before the basic concept of the K1 is to select a static waveform or sample, add a volume envelope and some modulation to it and combine either 2 or 4 of such elements, the so-called "sources".
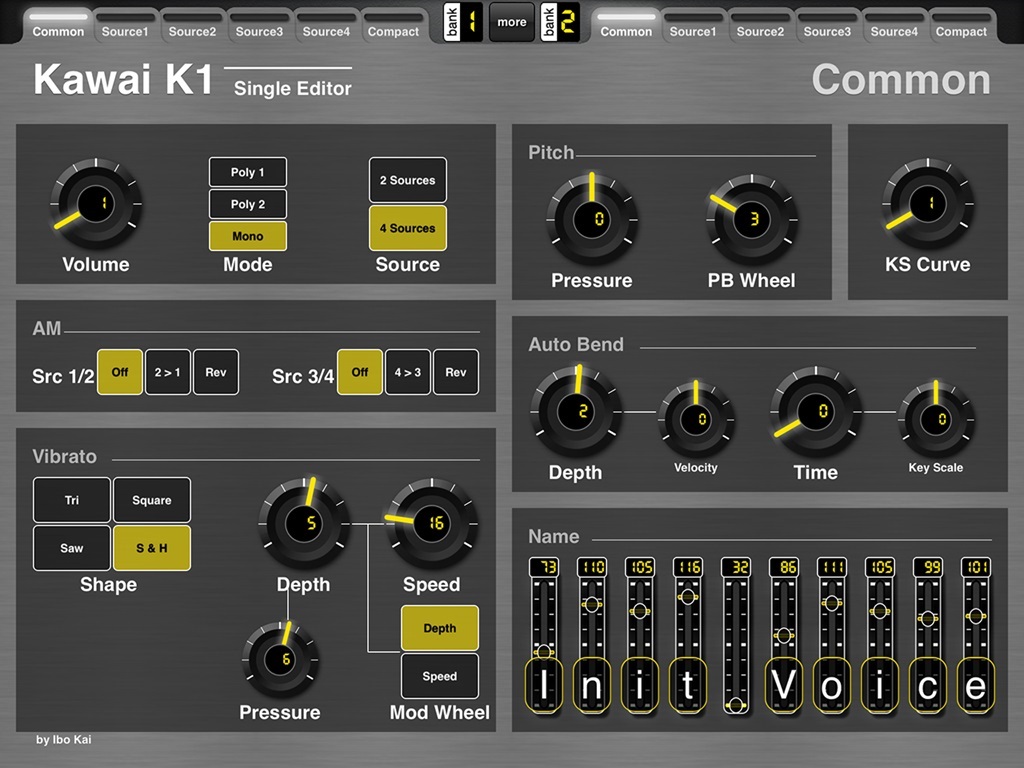
It starts with the common parameters, which make settings for all involved sources. There is the overall volume, the switching between using 2 or 4 sources, the poly/mono mode, pitch modulation and the naming. What becomes clear already in this section is, that the K1r allows for quite an unexpected degree of real-time control. For example the vibrato: the depth can be changed with aftertouch (here called „pressure“) and the modulation wheel can alter either its depth or its speed. There is an Auto Bend function, which is a simple pitch envelope. The two parameters are depth and time, while depth can be changed by velocity and time can be altered by key scale.
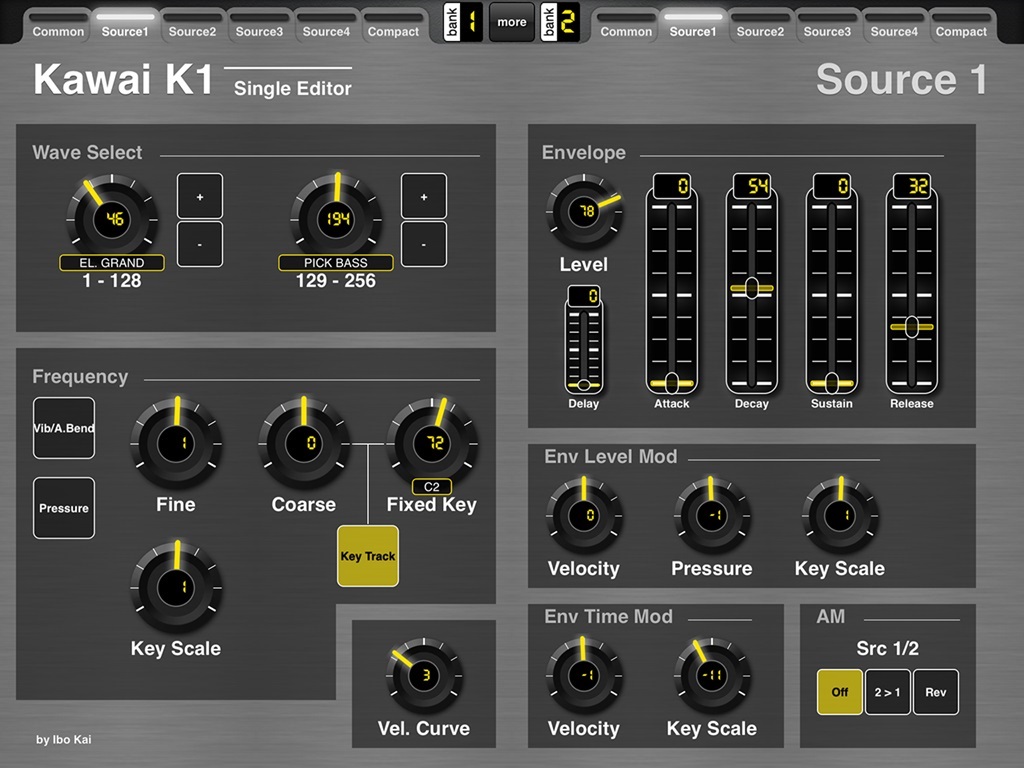
Each source programming will most certainly start with selecting a waveform for it. Unfortunately the display will show only a number, so you might need to put a printed copy of the wave list next to the synth or you just go through the numbers and decide by listening. By the way the wave list shows for each entry a graphical representation of both the waveform and its harmonic spectrum. Exception are the samples at the end of the list, which are mentioned only by name.
The sample section starts with a range of drum sounds, followed by various instrument sounds. The latter ones come in both one-shot and looped versions and include the typical „Kawai“ string and choir sounds. Towards the end of the list you will find 8 „omnibus loops“, which play several one-shot samples after another in a loop. Although this being a technical-wise interesting feature, the practical benefit is rather limited. Finally there are some reversed one-shots (snare, tom, guitar) and some variations with alternating loop, means playing forward/backward (hihat, crash, piano noise). Again those can be a nice effect, but with limited usability.
Samples
Next after the wave selection are settings for transpose and tune and wether to activate vibrato, auto bend or pressure modulation.
Then of course comes the amp (volume) envelope, which includes a delay at the beginning. This allows to play sources in a „one after the other“ fashion or to add sources over time. Both envelope levels and times can be modulated by velocity, aftertouch or key scale, allowing quite a nice degree of control to the player.
Nevertheless there is no filter, so the only way to get a dynamic sound is to use the sources for different parts of the sound, by using shorter and longer envelopes. For example source 1 could play a sample for the attack of the sound, decaying quickly. The second source plays a sustaining, rather bright wave, finally blending over to the third source, which plays a more dull sound. That leaves the 4th source to add an overall sustaining dull and slightly detuned wave to fatten up the whole sound. Now while adding some real-time control such as velocity and aftertouch plus key scaling will make it sound more lively, the K1 will never gain the same organic, acoustic feeling of other systems – except for the amplitude modulation.
This technique allows to modulate the amplitude of one sound with the amplitude of another. It results in a spectral change of the overall sound and thus is the only way in the K1 to achieve smooth changes in a sound over time. AM can be applied in pairs to source 1 and 2 and to source 3 and 4. For each pair you can select, which source will modulate the other. So by programming different envelopes for the 2 sources of such a pair, you can obtain changes in the brightness of a sound, similar to a filter (but sounding completely differently). AM has to be used with care, as it can lead to distortion quickly. After all it adds another dimension to the sonic capabilities of the K1, but it will certainly never make it sound like a vintage analogue synth!
Finally there is the Multi Patch area, where several single sounds can be combined for various purposes. A Multi Patch provides 8 slots, each of them can hold a single sound. Now for each slot the key and velocity zone can be set for layer and split combinations or different MIDI channels can be chosen for multi-channel operation from a sequencer. Some fine-tuning is possible via transpose, tune, level and output (left or right).
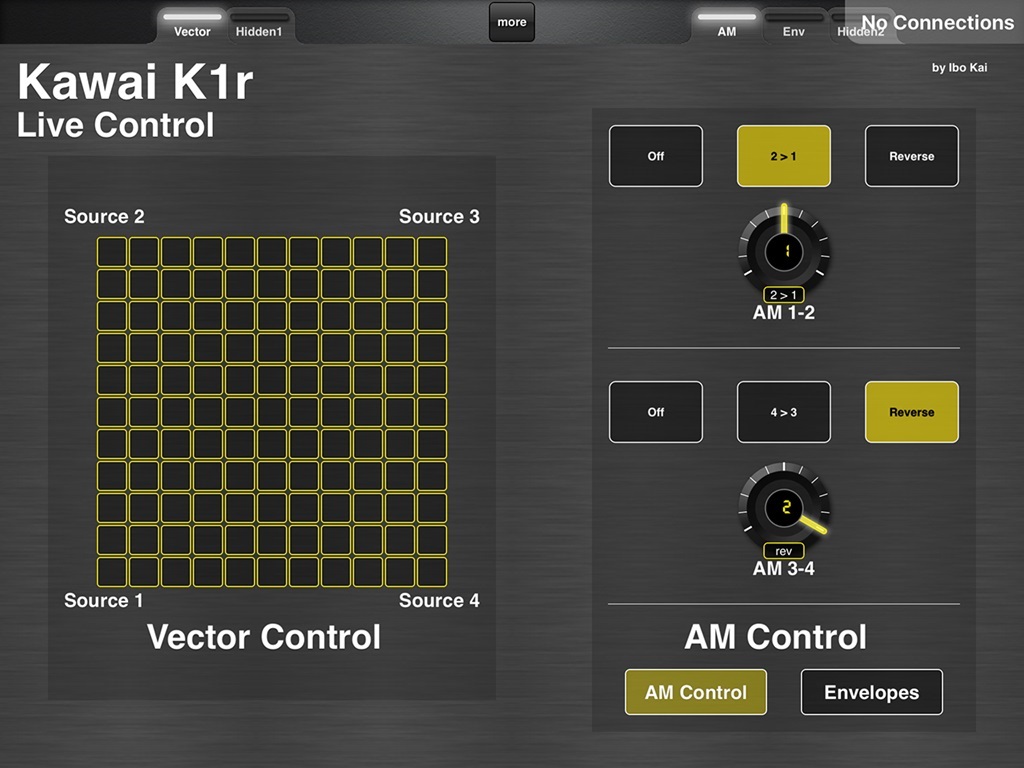
Vector Control
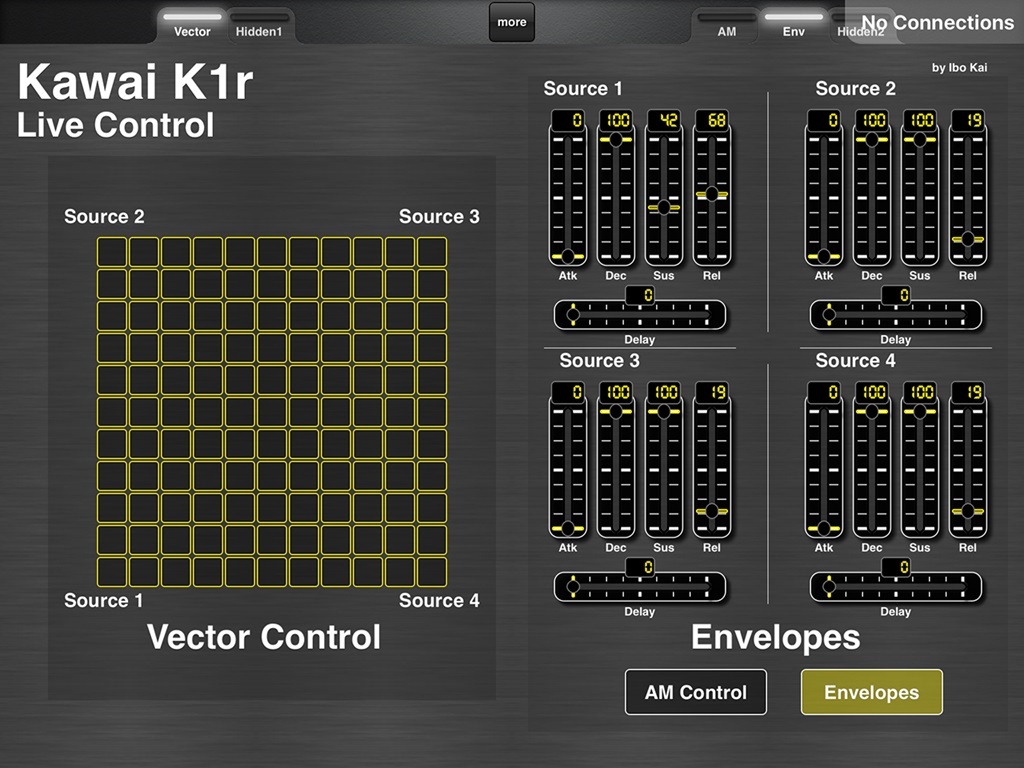
Both the K1 keyboard and the K1m desktop module provide a vector stick, which works basically like a joystick, but is not spring loaded, so it will remain in any position where you put it. It is used to crossfade between the 4 sources, a technology that first appeared in the famous Prophet VS from Sequential Circuits, the Korg Wavestation and some other synths from that time. The vector stick is a nice addition to get more live controlled movement into sounds, especially when used on pad sounds being played with long notes. However there is one problem about the K1/K1m vector stick: its movements are not transmitted via MIDI, so they cannot be recorded in a sequencer.
The K1r as a slim rack module obviously doesn´t provide a vector stick. Firstly it would be quite inconvenient to use a stick on the rack unit while playing on a keyboard. And also there is simply no space for it on the front panel.
To make up for this shortcoming I created a layout in MIDI Designer, a MIDI control app for the iPad ( read more details below). It features a kind of square matrix, which works pretty much the same as the vector stick of the keyboard. It consists of 11x11 buttons, each one sending a certain volume value in form of MIDI system exclusive data to each of the 4 sources. By arranging the values approprietely, the result is the crossfade between them. And the advantage over the keyboard and desktop versions is that these MIDI data can well be recorded, re-arranged and played back in a sequencer or computer DAW. Besides that the layout also provides some additional controls for setting the AM and the envelopes, which makes a nice package for some live control.
Sound
Sound: The waveforms available for each source cover a wide spectrum, but naturally they sound sterile, their names giving only a hint to their origin. And although they are sorted in groups like „basic waves“, „brass“, „guitar“ etc. you will most times end up in just stepping through the whole range to find what you need.
Regarding the samples their overall quality is rather low and they are short (and of course not multi-sampled), most probably due to limited wave ROM size. However they give a typical 80s touch and allow to easily mis-use them by extreme pitch shifting to come up with pretty out-of-this-world sounds.
After all the K1r can cover many sorts of sounds, from bass to evolving pads, from fancy leads to scifi FX. However it has a unique character due to it´s architecture and the combination of „K5-made“ waveforms and gritty samples. It also adds a noticable noise-floor, which can be heard especially with low notes. This can be annoying for clean bass sounds, but also fits in nicely with some leads or FX sounds.
The following examples are recorded without any FX or EQ, just the raw sound. Some massage in terms of reverb, delay or chorus will be essential to make them sound good in a production.
WS Pad
Voisaw Pad
Sawyer
Vintage Sample Bass
Darkness
Caveman
Hurdygurdy
Synthchoir
Poly Unison
Unison Bass
Is it additive?
There are discussions going on in forums through-out the web, wether the K1 can be called an additive synth or not. Well, at first glance combining a few waveforms and samples is not at all additive synthesis in terms of harmonic spectra. However as mentioned above the waveforms were made by using additive synthesis, so it has a certain tonal character pointing to that method. I owned a K5 many years ago and the sound of the K1 waves reminds a lot of that predecessor.
When looking at the wave list, you will find that the first entries are purely sine waves, with pitches of the first 16 harmonics.
Sinewaves
So in fact (theoretically) you can very well make an additive sound with the K1. But with only 4 partials, each chosen from 16 harmonics, this is in terms of real additive synthesis more than limited.
Additives
What it is much better for is to emulate electric organs, which were kind of additive systems, too. By selecting one of the basic „organ“ waveforms it allows to add single harmonics dynamically.
Organ Harmonics
Alternatives for editing:
As mentioned earlier the UI is not at all quick and intuitive to use, a problem that was often mentioned about digital synths from that era, when comparing to older (or newer) analog synths with a „one-knob-per-function“ scheme.
Since I own the K1r, I have never really bothered to program sounds on the unit itself. There are quite some alternatives around nowadays and this is what I am using.
In Emagics Sound Diver editor/librarian software there is of course an adaption for the K1/m/r. Having all parameters in one window on the computer screen already speeds up fiddling around with the functions a lot. Another benefit of course is that Sound Diver allows to save, sort and archive all patches from your K1 on the computer. I am running Sound Diver on a virtual Windows XP, as the Mac version is not compatible to any OSX. At the time OSX appeared, Apple bought Emagic and unfortunately they decided to not develop Sound Diver any further. There is an early beta of Sound Diver for OSX around somewhere, but it is said to be more and more unstable on recent OS versions.
Another alternative, which I am using a lot recently, is MIDI Designer. It is a MIDI controller app for the iPad, which naturally speeds up control even more. The downside is, that it comes with a blank page, means you have to make your control layouts by yourself. You have to learn how to set-up and program controls, which is not difficult. And you have to learn how MIDI system exclusive works, which is mostly down to how to read the MIDI documentation of a synth (if you can find it somewhere). On the other hand the app gives you the freedom to set up everything just as you like. And if you just look for an editor for a specific synth, there are quite many posted in the forum on the manufacturers website.
Besides the Live Control layout with the vector matrix, I also made a full single editor.
Links
Owner Manual and Wave List (incl. MIDI documentation): www.kawaius-tsd.com/pages/synth_om.html
MIDI Designer website: http://www.mididesigner.com/
K1r Live Control layout: http://mididesigner.com/qa/3792/layout-kawai-k1r-vector-control
K1r Single Editor layout: http://mididesigner.com/qa/4524/layout-sound-programmer-for-kawai-k1